Project
The basic idea of a smart mirror is to put a monitor behind a mirror. Even if the idea is pretty simple the realization of a smart mirror is not, infact while conceiving it we faced a lot of design choices (that we will deepen in the following paragraphs) that brought us to the concept in Fig.1
 Fig.1: Project design
As it can be seen the smart mirror is realized with a wooden frame that will contain a two way mirror and an LCD screen that is controlled by a Raspberry Pi.
The LCD screen and the Raspberry Pi will be both powered by a USB converter that is connected to a smart switch that governs the on/off phases of the whole structure.
Fig.1: Project design
As it can be seen the smart mirror is realized with a wooden frame that will contain a two way mirror and an LCD screen that is controlled by a Raspberry Pi.
The LCD screen and the Raspberry Pi will be both powered by a USB converter that is connected to a smart switch that governs the on/off phases of the whole structure.
Two way mirror
The major design issue we came across while developing our project is related to the mirror itself, in fact we need a mirror that not only shows our reflection but that also allow us to see the LCD screen behind it. A traditional mirror is not the solution because it is realized by coating with a reflective material such as silver (which is later painted) the back of a pane of glass, to ensure that all the light is reflected forward meaning that you can only see what is standing in front of the mirror. Instead a two way mirror is what we looked for, a mirror that is realized by applying to the front of a pane of glass a thin layer of metal, usually aluminium. The layer is so thin that only 60% (it can also be 70%, 80%, but never 100%) of the light that hits it is reflected back while the rest goes through the pane. This means that we will see our own reflection, but also what is behind the pane.
 Fig.2: Two way mirror concept
In order for the mirror to work properly, one side must be very bright (red one), while the other side must be pitch dark (blue one). In this way the bright side will reflect back the light allowing the surface to work as a traditional mirror (red one), meanwhile from the dark side very little light is transmitted through the surface and from this side (blue one), the mirror works as a regular window. With this being said, positioning the LCD screen behind the two way mirror and covering the remaining area with a black surface, allow us to obtain the results we want, in fact:
- when the LCD screen is OFF, we will see only our reflection because there is no light coming from the side behind the mirror;
- when the LCD screen is ON, the emitted light will allow us to see what is on the screen. This behaviour is only limited to the portion where mirror and LCD screen overlap due to the fact that the remaining surface is covered with the black layer.
However in Italy finding a two way mirror glass as described previously is not easy and when found the cost is astronomical for our budget. For these reasons we decided to realize a “cheap” version of a two way mirror by putting on a thin plexiglass slab ( in the order of few mm) a partially reflective film. As it can be seen in the following photos it works and the results are not that bad however is far from perfect in fact applying the film on a plane is not easy and eventually creates air bubbles that are pretty difficult to eliminate.

Fig.3: Screen off

Fig.4: Screen on
Development and realization
Frame
To support the mirror and the LCD screen we decided to design and realize a wood structure that consists in a wood frame and a wood panel.
The wooden frame stops the pane of glass and the LCD screen from falling over while the wood panel will
keep the screen in position and also allow us to have a plane where we can place all of the hardware we need for the smart mirror to work properly.
We have to point out that we painted the wood plane black to obtain the previously mentioned black surface that allows the plexiglass coated with the reflective film to work as a two way mirror.

Fig.3: Wood frame

Fig.4: Wood panel

Fig.5: Wood frame + Wood panel
To end this paragraph, we report the frame dimensions: Width 330 mm, lenght 535 mm, height 50 mm
Hardware design
According to what we said before is pretty obvious that the LCD screen plays a major role in the overall result of the smart mirror. Our decision on the screen dimensions was made bearing in mind that the bigger we take it, the higher will be its cost, its consumption, the frame dimensions and therefore the plexiglass and so on. Our choice therefore fell on a 10.1"LCD screen (link) that is a good compromise in terms of the readability behind the mirror and the overall dimensions of the structure.
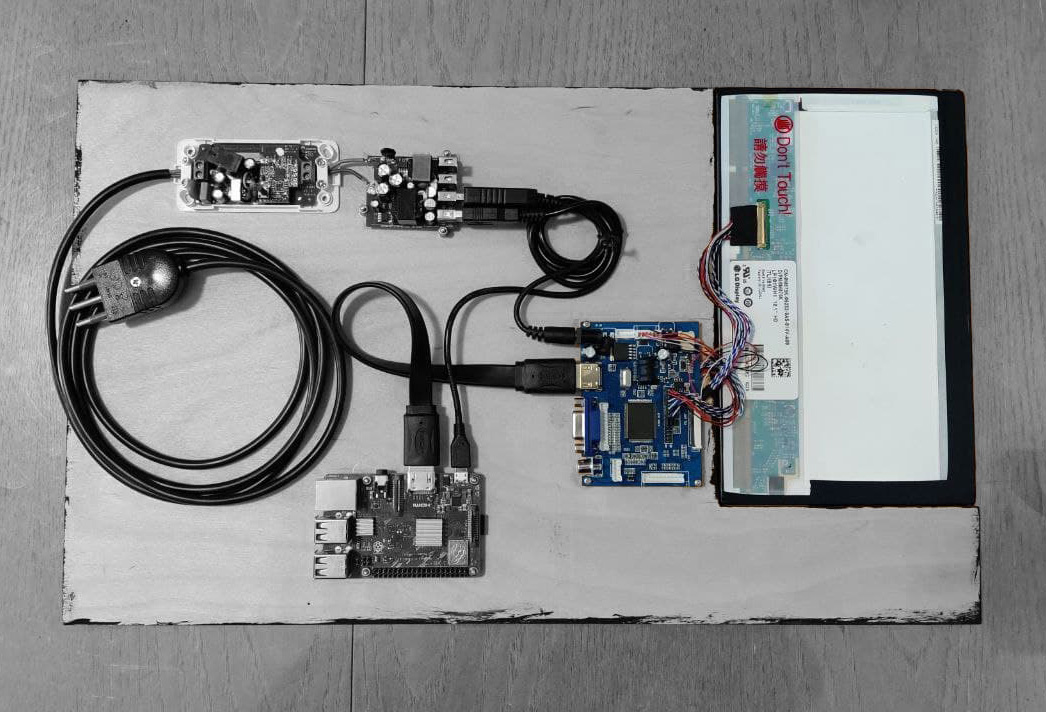 Fig.6: Screen on wooden panel
In order to develop the smart mirror user interface, we decided to work with a Raspberry Pi (link) because it is widely supported by companies and independent developers, allowing us to work with various programming languages and libraries. Another reason for this decision is the Raspberry Pi connectivity, in fact on the board it mounts a Wi-Fi receiver and an HDMI port. The first one is a key factor for the correct installation and configuration of the modules (see here), the second one connects the LCD screen and the Raspberry Pi with a simple HDMI cable (link).
 Fig.7: Raspberry Pi on wooden panel
To power up both the Raspberry Pi and the LCD screen we decided to use a USB converter (link), a choice made because we think is the best solution in terms of modularity and eventual expandability of the structure, due to the USB standard being vastly used. This means that if something does not work properly or must be upgraded their substitution will be much easier. We have to point out that the USB cable needed to power the Raspberry Pi is a USB plug (type A) to plug (type B mini) cable (link), instead for the LCD screen we needed a USB cable equipped with a power converter (link) that could convert the USB output into a proper voltage for the driver board of the screen. To fit the converter behind the mirror as the previous two components it required to open up the converter. Looking at the cables in Fig. 8, going from the board to the plug we deemed them very fragile and short.
 Fig.8: USB Converter
For this reason we decided to cut the wires and solder new ones to the converter board, as it can be seen in the video below:
 Fig.9: Converter on wooden panel
At this point the converter input should be the power line in our houses, however we decided to put between the two a smart switch (link). Connecting the switch to the Wi-Fi network and downloading its proprietary app, in a few steps is possible to connect it to the Google home app enabling the user to control the turn on/off of the mirror through the app or more conveniently through the Google assistant as shown here(link).
 Fig.10: Sonoff on wooden panel
In the end, after connecting every component as detailed above we obtain the circuit in Fig.11, which has been tested to see if every piece works correctly.
 Fig.11 Final product
Software design
From a software point of view, we decided to use MagicMirror², an open source modular smart mirror platform which is based on 3rd party modules.
Due to the fact that MagicMirror² is well supported by its community the number of modules we could pick is colossal;
this meant that we had at our hand a huge library from where we could get whichever functionality we wanted to add on our smart mirror.
Consequentially the question that popped up was:
“what informations would you like to see while brushing your teeth or putting up make up?”
The answers we came up with are meteo, agenda/calendar, clock, news feed and Spotify player.
With this sorted out we looked for the best modules that suited our ideas. After an endless ammount of modules downloaded and tested,
we kept the orginal clock, calendar and news modules that come with the installation of MagicMirror² due to the fact that they were already
geared with all the functionalities we looked for. Instead for the weather and Spotify player modules we choose third-party modules respectively
MMM-OpenWeatherForecast and MMM-NowPlayingOnSpotify.
After their install and configuration (link) the final GUI of our smart mirror is the one shown in Fig.12, where we highlited every module.
 Fig.12: Screen with modules explanation
Final product
In the end, combining the two way mirror, the wooden frame and all the hardware components, we obtain the definitive version of our smart mirror prototype, that can be seen in Fig.13
 Fig.13: Final product
Possible future developments
Budgetless
As already said above, the dimensions of the mirror are pretty limited due to the fact that the LCD screen gets expensive as it gets bigger. It is pretty obvious that with a bigger screen the number of modules that could be added would increase and also the whole text and info shown would be more readable. Another improvement could be to use a real two way mirror instead of the solution we described at the beginning.
Infinite possibilities
The smart mirror is based on modules, it means that any user could modify and add a different module more suited for its taste. For example if you are a sport maniac is possible to add a module that shows real time game results, if you are a broker is possible to add the stock market inflations, and the list goes on and on.
Even smarter
As mentioned above, the mirror is integrated with the Google assistant but needs the presence of a device that as already installed it, like an android phone or the Google Nest audio.Having said that, an improvement we think could be doable is to integrate in the mirror structure a microphone and a couple of speakers combining the smart mirror with a vocal assistant in the same structure.
