Software development
Software development is the primary component of the assignement and is divided into:
- Video acquisition and processing by means of a computer running a Linux distribution
- Serial communication between the computer and Arduino
- Drive of the servos using Arduino
Video acquisition and processing by means of a computer running a Linux distribution
With regard to the processing and the acquisition of the video, the employed libraries are Open Source OpenCV 3.0 beta and its “contrib modules” (i.e. additional third-part modules).
The chosen programming language is C/C++.
OpenCv libraries were chosen for their intuitive (and free) interface, making somewhat easier the painstaking problem of video processing.
The primary problem is the recognition of a series of relevant points inside an image in order to distinguish a particular object.
For preparation, the following links are suggested:
Video acquisition is carried out by means of the VideoCapture class of OpenCv, which offers a simple interface to capture both video coming from an external device (e.g. a webcam) and images from a video saved on the computer.
Specifically, the code is:
VideoCapture cap(atoi(argv[2]));

	if (!cap.isOpened())
	{
		error = ERROR_CAM;
		printf("WebCam not found\n");
		printf("Program terminated with ERROR %d!\n", error);
		return error;
	}
As shown above, in a few lines OpenCv allows to define a VideoCapture object, to assign to it the video acquisition device (here the device ID, generally being 0, is passed as argument argv[2]) and to verify that the video stream is working correctly through the VideoCapture::isOpened class.
The following step is video processing. To this end the VideoCapture object is passed to the function called SM_Handler, accountable for the operations of the state machine on which the entire program is based:
error = SM_Handler(cap, argv[1]);
The second argument passed to the SM_Handler function through argv[1] relates to serial communication and will be discussed further on.
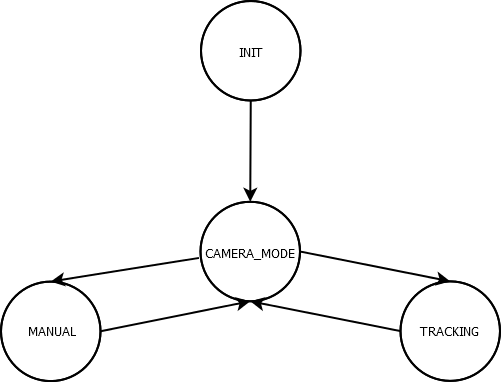
The state machine is made up of four states: INIT, CAMERA_MODE, MANUAL and TRACKING.
The state transitions diagram is the following:
In the following table is displayed the behavior of the program given a state and the avalable actions for each state:
| STATE | BEHAVIOR | AVAILABLE ACTIONS |
|---|---|---|
| INIT | Logo visualization. | ESC to exit the program |
| SPACE to switch to CAMERA_MODE | ||
| CAMERA_MODE | Video acquisition. | ESC to exit the program |
| F to flip the image horizontally | ||
| P take a picture | ||
| S to activate/disable the servos | ||
| R to invert the horizontal movement of the servos | ||
| V to change the servos rotation speed after having set it with its trackbar | ||
| M for MANUAL state | ||
| T for TRACKING state | ||
| MANUAL | Video acquistion and manual drive of the servos. | ESC to switch to CAMERA_MODE |
| F to flip the image horizontally | ||
| P take a picture | ||
| R to invert the horizontal movement of the servos | ||
| V to change the servos rotation speed after having set it with its trackbar | ||
| WASD to move the servos | ||
| C to move the servos to their default position | ||
| TRACKING | Video acquisition and tracking of a detail inside the image. Automatic movement of the servos. | ESC to move to state CAMERA_MODE |
| V to change the servos rotation speed after having set it with its trackbar | ||
| MOUSE_SX to draw the area containing the detail to follow | ||
Focusing now on the TRACKING state, it will now be shown how the tracking of a single detail inside an image is implemented.
OpenCV Contrib Modules contain the Tracking class. It, in turn, allows the following methods:
- Tracker::create(const String& trackerType);
Allows to create a new Tracker element using the chosen algorithm (either "MIL" or "BOOSTING"). The create method is called by the Video Follower program each time that the state moves form CAMERA_MODE to TRACKING:
else if (((c == 't') || (c == 'T')) && (servoRun == true))
{
    if(NULL == (tracker = Tracker::create("MIL")))
    {
       error = ERROR_TRACKER;
       break;
    }

    state = TRACKING;
}
- Tracker::init(const Mat& image, const Rect2d& boundingBox);
Initializes the Tracker object with the detail to follow.
The method is called as soon as the user completes the selection of the detail in the image.
- Tracker::update(const Mat& image, CV_OUT Rect2d& boundingBox);
Updates Tracker with the new frame of the video and returns the coordinates of a rectangle containing the object to follow:
if(true == objSelected)
{
    if(false == trackerInitialized)
    {
        if(!tracker->init(image, objBox))
        {
            error = ERROR_TRACKER;
            break;
        }

        trackerInitialized = true;
    }
    else
    {
        if( tracker->update(image, objBox))
	{
	    /* Move servos */
	}
    }

    /* Other code */
}
- Tracker::clear();
Deletes Tracker object. It is called moving from the TRACKING state to CAMERA_MODE state.
Serial communication between the computer and Arduino
Library libSerial, available for every Linux distribution, executes the serial communication between the laptop and Arduino.
After having declared a SerialStream object, the following functions were written:
- char connectServo (char serialName[]);
This function open the serial communication with the device pointed to by the string named serialName; as stated before, serialName is passed as argv[1] when the program begins. - void servoSet (char param);
This function sends a configuration parameter though the serial port. The possible parameters are the following:- UP: Upward movement of the servos
- DOWN: Downward movement of the servos
- LEFT: Movement toward the left-hand side of the servos
- RIGHT: Movement toward the right-hand side of the servos
- TO_DEFAULT: Servos move to their default position
- SPEED_1: Servos move 1 degree at a time
- SPEED_2: Servos move 2 degree at a time
- SPEED_3: Servos move 3 degree at a time
- SPEED_4: Servos move 4 degree at a time
- SPEED_5: Servos move 5 degree at a time
if( tracker->update(image, objBox))
{
    /* Find objBox center */
    objCenter.x = objBox.x + objBox.width/2;
    objCenter.y = objBox.y + objBox.height/2;

    /* Move servos */
    if (objCenter.x < referenceBox.x)
    {
        if (false == reversed)
            servoSet(LEFT);
        else
            servoSet(RIGHT);

        if (objCenter.x > referenceBox.x + referenceBox.width)
        {
            if (false == reversed)
                servoSet(RIGHT);
            else
                servoSet(LEFT);
        }
        if (objCenter.y < referenceBox.y)
            servoSet(UP);
        if (objCenter.y > referenceBox.y + referenceBox.height)
            servoSet(DOWN);
    }
}
- char servoGetParam (char code);
Requests the state of an Arduino parameter. The parameters are:- X_AXIS: Requests to Arduino the current position of the servo responsible fot horizontal movement
- Y_AXIS: Requests to Arduino the current position of the servo responsible fot vertical movement
- RIGHT_LIMIT: Requests to Arduino which is the the maximum rotation of the servos toward the right-hand side
- LEFT_LIMIT: Requests to Arduino which is the the maximum rotation of the servos toward the left-hand side
- UPPER_LIMIT: Requests to Arduino which is the the maximum rotation of the servosin upward movement
- LOWER_LIMIT: UPPER_LIMIT: Requests to Arduino which is the the maximum rotation of the servosin downward movement
- void disconnectServo ();
Shuts down the serial communication with the servos.
Drive of the servos using Arduino
Now that serial communication to Arduino is enabled, it is required to allow communication in the other direction, from Arduino to the Personal Comuter.
The Arduino board has been chosen for this project partly for how simple its interconnection with a computer is through the serial interface; further, many a documentation can be found on the Internet, making this phase of the project significantly easier.
Moreover, servos movement is made somewhat easier to control through Arduino, being there available several high-level functions with regard to this in the official Arduino libraries.
As before, the two servos and the beginning of serial communication must be declared. The latter by means of the function setup() from the Arduino sketch in the following way:
void setup ()
{
    /* Serial port initialization */
    Serial.begin(BAUDRATE);
    inputString.reserve(200);

    /* Servos initialization */
    Xservo.attach(X_SERVO_PIN);
    Yservo.attach(Y_SERVO_PIN);
}
Data reception is handled by the SerialEvent() function, which is called when a communication toward Arduino is detected. Received symbols are saved in a string named inputString.
void serialEvent()
{
    while (Serial.available())
    {
       char inChar = (char)Serial.read();
       inputString += inChar;

       if (inChar == '\n')
       {
          stringComplete = true;
       }
    }
}
When the conclusion character "\n" is detected, the parameter sent beforehand by the PC is extracted from the string, which in turn entails either a movement of the servos or a communication from Arduino to the PC:
switch(move)
{
    case UP:              if(Yposition <= (UPPER_LIMIT - INCREMENT))
                          {
                            Yposition += INCREMENT;
                            Yservo.write(Yposition);
                            delay(DELAY);
                          }
                          break;

    case DOWN:            if(Yposition >= (LOWER_LIMIT + INCREMENT))
                          {
                            Yposition -= INCREMENT;
                            Yservo.write(Yposition);
                            delay(DELAY);
                          }
                          break;

    case RIGHT:           if(Xposition >= (RIGHT_LIMIT + INCREMENT))
                          {
                            Xposition -= INCREMENT;
                            Xservo.write(Xposition);
                            delay(DELAY);
                          }
                          break;

    case LEFT:            if(Xposition <= (LEFT_LIMIT - INCREMENT))
                          {
                            Xposition += INCREMENT;
                            Xservo.write(Xposition);
                            delay(DELAY);
                          }
                          break;

    case TO_DEFAULT:      digitalWrite(GREEN_LED, LOW);
                          digitalWrite(YELLOW_LED, LOW);
                          digitalWrite(RED_LED, HIGH);

                          while(Xposition > DEFAULT_X)
                          {
                            Xposition--;
                            Xservo.write(Xposition);
                            delay(DELAY);
                          }
                          while(Xposition < DEFAULT_X)
                          {
                            Xposition++;
                            Xservo.write(Xposition);
                            delay(DELAY);
                          }
                          while(Yposition > DEFAULT_Y)
                          {
                            Yposition--;
                            Yservo.write(Yposition);
                            delay(DELAY);
                          }
                          while(Yposition < DEFAULT_Y)
                          {
                            Yposition++;
                            Yservo.write(Yposition);
                            delay(DELAY);
                          }

                          digitalWrite(RED_LED, LOW);
                          digitalWrite(GREEN_LED, HIGH);

                          break;

    case SPEED_1:         INCREMENT = 1;
                          break;

    case SPEED_2:         INCREMENT = 2;
                          break;

    case SPEED_3:         INCREMENT = 3;
                          break;

    case SPEED_4:         INCREMENT = 4;
                          break;

    case SPEED_5:         INCREMENT = 5;
                          break;

    case GET_XPOS:        Serial.write(Xposition - DEFAULT_X);
                          break;

    case GET_YPOS:        Serial.write(Yposition - DEFAULT_Y);
                          break;

    case GET_LEFT_LIMIT:  Serial.write(LEFT_LIMIT - DEFAULT_X);
                          break;

    case GET_RIGHT_LIMIT: Serial.write(RIGHT_LIMIT - DEFAULT_X);
                          break;

    case GET_UPPER_LIMIT: Serial.write(UPPER_LIMIT - DEFAULT_Y);
                          break;

    case GET_LOWER_LIMIT: Serial.write(LOWER_LIMIT - DEFAULT_Y);
                          break;

    default:              break;

}